Getting started with Terraform with GCP
Infrastructure as code (IaC) has become so popular these days that it is no longer a skill of a particular team like platform engineering or DevOps.
When I used to build Apache Spark pipelines using Cloudera, my task was only to make the pipeline run and not worry about any infrastructure needed for it, as those were managed by a different team. When I started working on building pipelines using GCP, the requirement was that everyone who built pipelines also had to manage the infrastructure and CI/CD needed for those pipelines.
This article explains how to get started with Terraform and manage infrastructure in GCP from your local system. We will create a simple GCS bucket using our Terraform code, but it will be easier to expand once we get the basics working.
1. Install Terraform
The easiest way to install Terraform on your local system is by using Brew.
1
brew install terraform
2. Create a Service Account
Let us create a service account in GCP that will be used by Terraform to create and manage the resources. It is always better to create a separate service account for Terraform rather than using your user account since you can control the access needed.
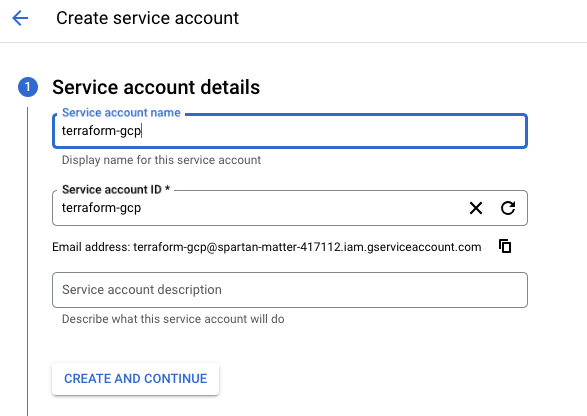
a. From your GCP Cloud console, choose “IAM & Admin” -> “Service Accounts” and click “Create Service Account.” Enter a name and account ID.
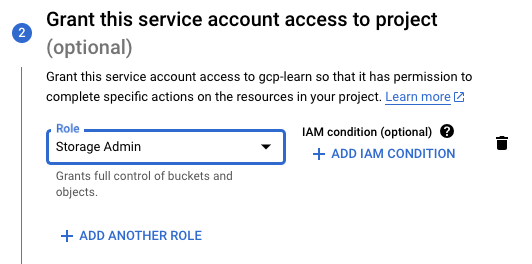
b. Let us give this service account the access it needs. For our use case, we would need to give only the “Storage Admin” role since we are only going to create and delete GCS buckets.
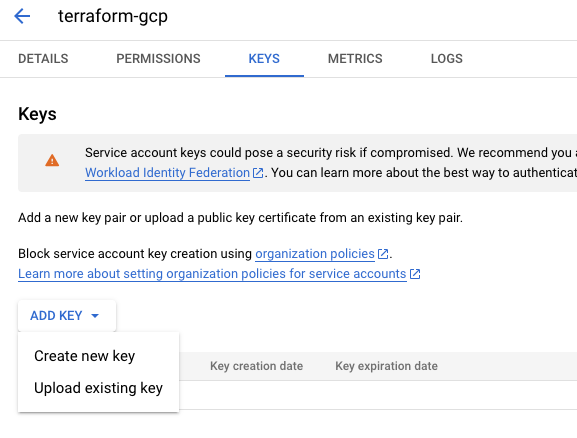
c. Once the service account is created, we will create keys that we will need from our local system to connect to the GCP Project. Click on “Actions” and “Manage Keys”
d. Click on “Add Key” and “Create new key”.
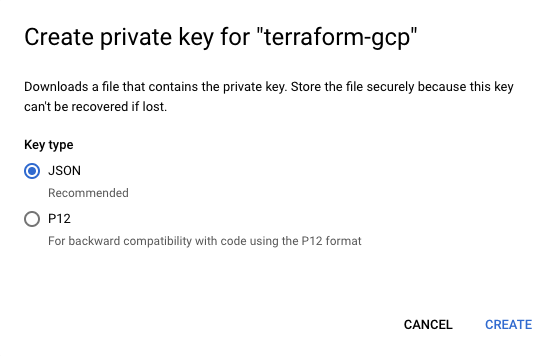
e. Choose the Key Type as “JSON” and hit “Create”. This would download the keys JSON file on your local system. Make sure not to share this file with anyone, as anyone would be able to access your GCP account with these keys. Rename the file to “keys.json”.
3. Create Terraform code
Let us start building the Terraform code. I have seen many code samples having just a single main.tf file, which would consist of all the terraform code in that single file. While creating this single file is easier, it is never easier from a readability perspective. If we create multiple files with the name of the file meaning what it does, it helps with readability.
Cloud Functions -> functions.tf
Cloud Dataflow -> dataflow.tf
Cloud Storage -> gcs.tf
Cloud PubSub -> pubsub.tf
You get the point with the file naming. When someone new looks into the file structure, they will immediately have an understanding of the components the pipeline needs without even looking at the code.
First, let us create a file called ‘provider.tf’ and add the below contents. This would say which provider we are using; in our case, it is Google with version 5.21.0.
We also maintain provider configurations like the project, region, and the credentials path to our keys.json file downloaded previously.
provider.tf
1
2
3
4
5
6
7
8
9
10
11
12
13
14
terraform {
  required_providers {
    google = {
      source  = "hashicorp/google"
      version = "5.21.0"
    }
  }
}

provider "google" {
  project     = <GCP_PROJECT_ID>
  region      = <REGION>
  credentials = "keys.json"
}
Next, we create gcs.tf, which holds the code needed for creating the GCS bucket. Replace the name with a unique name and change the location.
gcs.tf So in the end, our folder structure would look something like the below. Note that I have copied the keys.json on the same level as the Terraform files.
1
2
3
4
.
├── gcs.tf
├── keys.json
└── provider.tf
4. Terraform Init
Let us initialize Terraform by running the below command.
1
terraform init
1
2
3
4
5
6
7
8
9
10
11
12
13
Initializing the backend...

Initializing provider plugins...
- Finding hashicorp/google versions matching "5.21.0"...
- Installing hashicorp/google v5.21.0...
- Installed hashicorp/google v5.21.0 (signed by HashiCorp)

Terraform has created a lock file .terraform.lock.hcl to record the provider
selections it made above. Include this file in your version control repository
so that Terraform can guarantee to make the same selections by default when
you run "terraform init" in the future.

Terraform has been successfully initialized!
5. Terraform Plan
Once we are done initializing, we could run ‘terraform validate’ to validate whether the terraform code is correct and not missing any parameters.
Next, we run the below command to see what Terraform would create from the code. This would not create anything in GCP yet; it would only show the changes that would be applied.
We can go through the output and see if it matches expectations.
1
terraform plan
1
2
3
4
5
6
7
8
9
10
11
12
13
14
15
16
17
18
19
Terraform will perform the following actions:

  # google_storage_bucket.gcs-bucket will be created
  + resource "google_storage_bucket" "gcs-bucket" {
      + effective_labels            = (known after apply)
      + force_destroy               = false
      + id                          = (known after apply)
      + location                    = "AUSTRALIA-SOUTHEAST1"
      + name                        = "test-gcs-tf-bucket"
      + project                     = (known after apply)
      + public_access_prevention    = (known after apply)
      + rpo                         = (known after apply)
      + self_link                   = (known after apply)
      + storage_class               = "STANDARD"
      + terraform_labels            = (known after apply)
      + uniform_bucket_level_access = (known after apply)
      + url                         = (known after apply)
    }
Plan: 1 to add, 0 to change, 0 to destroy.
The output says 1 to add, and it is a GCS bucket, as we expected.
6. Terraform Apply
Once we are happy with the plan, we could run the below command to create the infrastructure in GCP.
1
terraform apply
This would again show the same output as the terraform plan and ask to confirm. Typing ‘yes’ would create the resources.
1
2
3
4
5
Do you want to perform these actions?
  Terraform will perform the actions described above.
  Only 'yes' will be accepted to approve.

  Enter a value:
We get a message saying ‘Apply complete’ and ‘1 added’ as we expected.
1
2
3
4
google_storage_bucket.gcs-bucket: Creating...
google_storage_bucket.gcs-bucket: Creation complete after 5s [id=test-gcs-tf-bucket]

Apply complete! Resources: 1 added, 0 changed, 0 destroyed.
We can open the GCP console, go to “Cloud Storage,” and confirm if the bucket is created. We could see that the bucket was created.
7. Terraform Destroy
Once we create our resources, we also need to have a safe way to delete all the resources that we created. This is to make sure that we don’t miss anything that could cost us. It is also very useful during a POC development wherein the resources are controlled in one place.
Running the below command deletes all the resources that Terraform created.
1
terraform destroy
The output would show the resources that would be deleted and ask for confirmation. We could see that it says ‘1 to destroy’ and it is our GCS bucket that Terraform created earlier.
1
2
3
4
5
6
7
8
9
10
11
12
13
14
15
16
17
18
19
20
21
22
23
Terraform will perform the following actions:

  # google_storage_bucket.gcs-bucket will be destroyed
  - resource "google_storage_bucket" "gcs-bucket" {
      - default_event_based_hold    = false -> null
      - effective_labels            = {} -> null
      - enable_object_retention     = false -> null
      - force_destroy               = false -> null
      - id                          = "test-gcs-tf-bucket" -> null
      - labels                      = {} -> null
      - location                    = "AUSTRALIA-SOUTHEAST1" -> null
      - name                        = "test-gcs-tf-bucket" -> null
      - project                     = "spartan-matter-417112" -> null
      - public_access_prevention    = "inherited" -> null
      - requester_pays              = false -> null
      - self_link                   = "https://www.googleapis.com/storage/v1/b/test-gcs-tf-bucket" -> null
      - storage_class               = "STANDARD" -> null
      - terraform_labels            = {} -> null
      - uniform_bucket_level_access = false -> null
      - url                         = "gs://test-gcs-tf-bucket" -> null
    }

Plan: 0 to add, 0 to change, 1 to destroy.
After confirming, the bucket was deleted, and we could see the message ‘Destroy complete!’
1
2
3
4
google_storage_bucket.gcs-bucket: Destroying... [id=test-gcs-tf-bucket]
google_storage_bucket.gcs-bucket: Destruction complete after 1s

Destroy complete! Resources: 1 destroyed.
For other GCP resources, we could check the link for Terraform provider Google Cloud and check the code needed for the GCP resource that you need.
In this article, we saw how to create and delete resources in GCP using Terraform from our local. This is only for getting started. In an actual use case, the Terraform code would run in a CI/CD environment like GitHub Actions, Harness, Circle CI, etc.
In my next article, let us explore how we could do the same using GitHub actions, which should simulate a production use case.
